This month I returned to the 1970s and 1980s for my focus on a craft I dabbled in at that time - namely macrame. It was quite the trend and almost everyone was using it to decorate their home. There were wall hangings, flower pot holders, towel holders, wine bottle hangers and the list goes on. As far as icons, the first one I think of is the owl. I do recall lots of wooden beads, ceramic fish, mushrooms, owls, chickens/roosters etc. into whatever design I did.
 |
| August CQJP 2015 - Macrame |
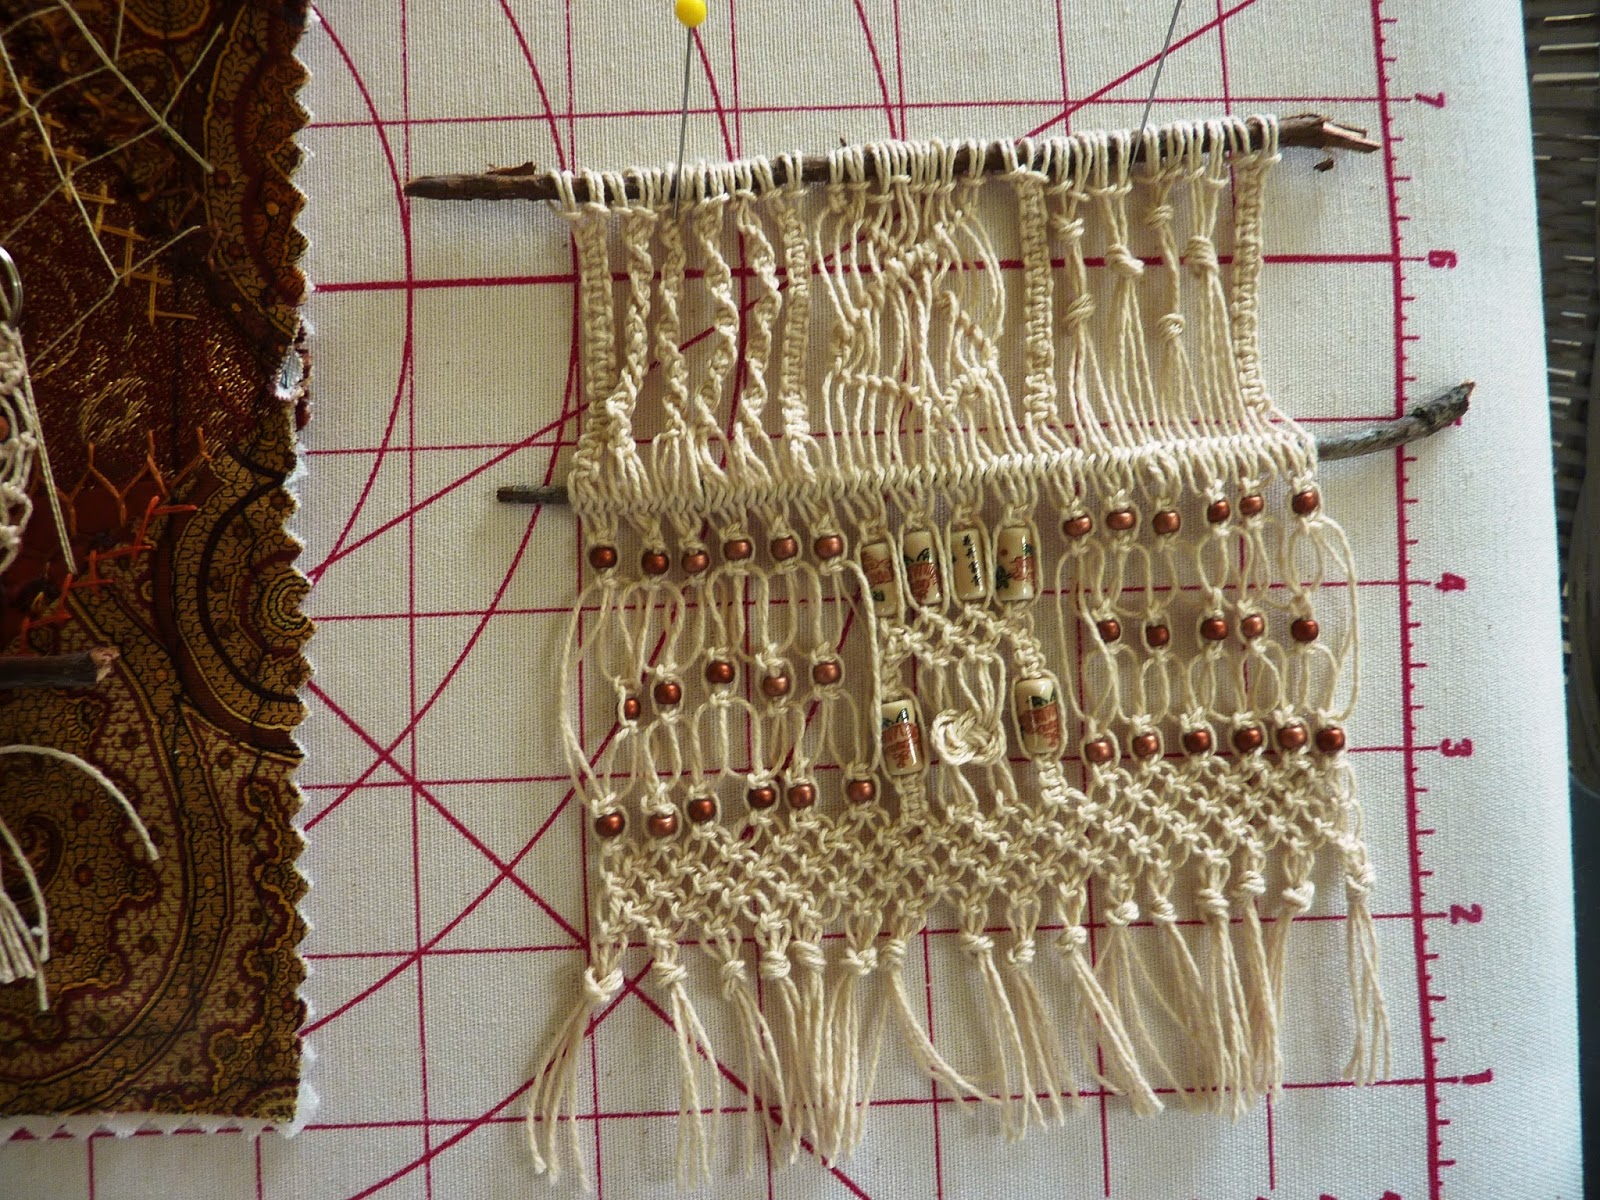
The big challenge was recreating some of these things in a size appropriate for my crazy quilt block. I went ahead and embroidered the seams of my block in coordinating floss so they wouldn't overpower any macrame pieces I would later add. Following directions for a sampler in one of my stitchery books, I used a #10 cotton thread in a natural color. I followed the directions for a full-size design and as a result wasn't sure what dimension my designs using a much smaller fiber would be when completed. Below is the first sampler I created. Please don't be too critical since it had been over 40 years since I had done any macrame. Although it only ended up about four inches wide and five inches long without the fringe, this took hours! In my opinion it took up too much space on the block also but was a great practice piece.
I ended up creating my own version of a sampler as shown to the left on my finished block.

I attached the threads with the Larks Head Knots. The next row is the Horizontal Clove, a/k/a Double Half Hitch. Below that are four columns called Sinnets. The outer ones are Square Knot Sinnets and the two center twisted ones are Half Knot Sinnets. The Half Knots create a natural twist. The two Half Knot Sinnets are joined at the base with two square knots, then all are used to create the Alternating Square Knots.

Next, the middle section of the sampler is topped with another Horizontal Clove, followed by Diagonal Cloves with an added bird bead. Below the bird is another bead, a Square Knot Picot and some more Square Knots spaced further apart. A row of beads were then secured in place with Square Knots and another Horizontal Clove.

The bottom third following the last Diagonal Clove is Interwoven Square Knots, beads, and Alternating Square Knots. Finally Overhand Knots were tied to secure threads, leaving some length of threads loose to form the fringe.

I tied two Josephine Knots to the securing thread at the top to finish it off.

Of course I had to have an owl somewhere! Using the full size pattern which used Lark's Head Knots to attach fibers to a ring, the remainder was created with Square Knots and Diagonal Cloves. A small twig was attached at the base, threads wrapped together at the base and cut to form fringe.

I had been wishing I would have kept my old macrame instruction booklets and wondered if it would even be possible to find the older ones anywhere. God works in mysterious ways! I went to our church's garage sale and there was a large cooler full of macrame supplies...and several booklets for $5! Of course it would have been crazy not to snatch up those items. In one of the books was this giant spider tutorial. As most of you know spider webs and spiders on CQ blocks are good luck so of course I needed to make this in a small size. Gulp.
The spider was made using two Berry Knots. I had never heard of Berry Knots that I recall let alone made anything with one, but decided 'nothing ventured, nothing gained'. It wasn't that bad really (I can say that now that it's done). To give due credit, the spider was in a booklet called "How to Make Plant Hangers" by author/designer Lynn Paulin. The copyright date is 1974 and there are a couple of numbers including HP-420 and 13-99088 which may possibly help identify the booklet. I actually Googled her and an Amazon site came up with this booklet listed. You can find it HERE. Also some on Etsy, HERE. You have to love Google. I didn't create my spider in exactly the same was as Lynn Paulin, but she deserves the credit for the idea. Unfortunately I couldn't find a way to contact her.
The legs in the tutorial were made by wrapping cords over wire I believe. Since mine would be stitched in place I didn't feel they needed the wire support which I envisioned as being very frustrating in this small size, so I simply braided three threads together for each set of legs, knotting the ends and joints. I was going to do the macrame web also but opted to just stitch one onto the block with embroidery floss a shade darker than the spider.

I'm hooked! The box included all these wonderful booklets (not sure why this loaded sideways?)...

All these beads for macrame....

And a lot of fibers for full sized projects.
I can see where the knots used in macrame can be used to embellish crazy quilt blocks and I'm hoping to make more of the spiders eventually adding them to my (neglected) Etsy shop. What a fun trip into the past!