

For this all you need is ribbon of choice, thread to match the ribbon, and a simple sewing needle. Of course you will want something for the center after it is constructed, but you can play with things you have in your stash later and see what works best for your needs.
I used 7/8" wide ribbon. This is not wired ribbon. Cut the ribbon just under 3" in length (about three times the width). For the five petal flower you will need five strips.

(2) Fold the ribbon in half lengthwise (wrong sides together-if there is a wrong side). Find the middle and tack stitch just on the edge. See photo above.

(3) Fold the ribbon in half with the tacked stitch on the inside. Match the raw edges together and with the thread knotted on the end, do a running stitch through both ends from one edge to the other. You could also use your sewing machine for this using a basting stitch setting. If your ribbon ravels really bad, you may want to cut your strips a little longer so you can allow a little more of a salvage end.

(4) Pull the thread tightly to gather the raw edges. knot the thread and run the needle and thread through the gathered end a couple more times to secure it. Lock it in place with a knot.

(5) Repeat on the other four sections so that you have your five petals.

(6) Again, with your thread knotted on the end, run your thread through the gathers of each petal, one after the other, until all five petals are strung together. Continue back through the first petal in the same manner and pull all five together tightly and secure with a knot. I like to run the thread through a couple more times, again securing them tightly together with a knot.

(7) Fluff and arrange the petals until you are happy with the spacing. To cover the center I stitched a button in place, shown directly above. You can use anything in the center that is an appropriate size to cover the raw edges underneath. Below you can see I placed a velvet flower in the center with a small purchased pink organza rose over that. Layering gives you a great look.


(6) Again, with your thread knotted on the end, run your thread through the gathers of each petal, one after the other, until all five petals are strung together. Continue back through the first petal in the same manner and pull all five together tightly and secure with a knot. I like to run the thread through a couple more times, again securing them tightly together with a knot.
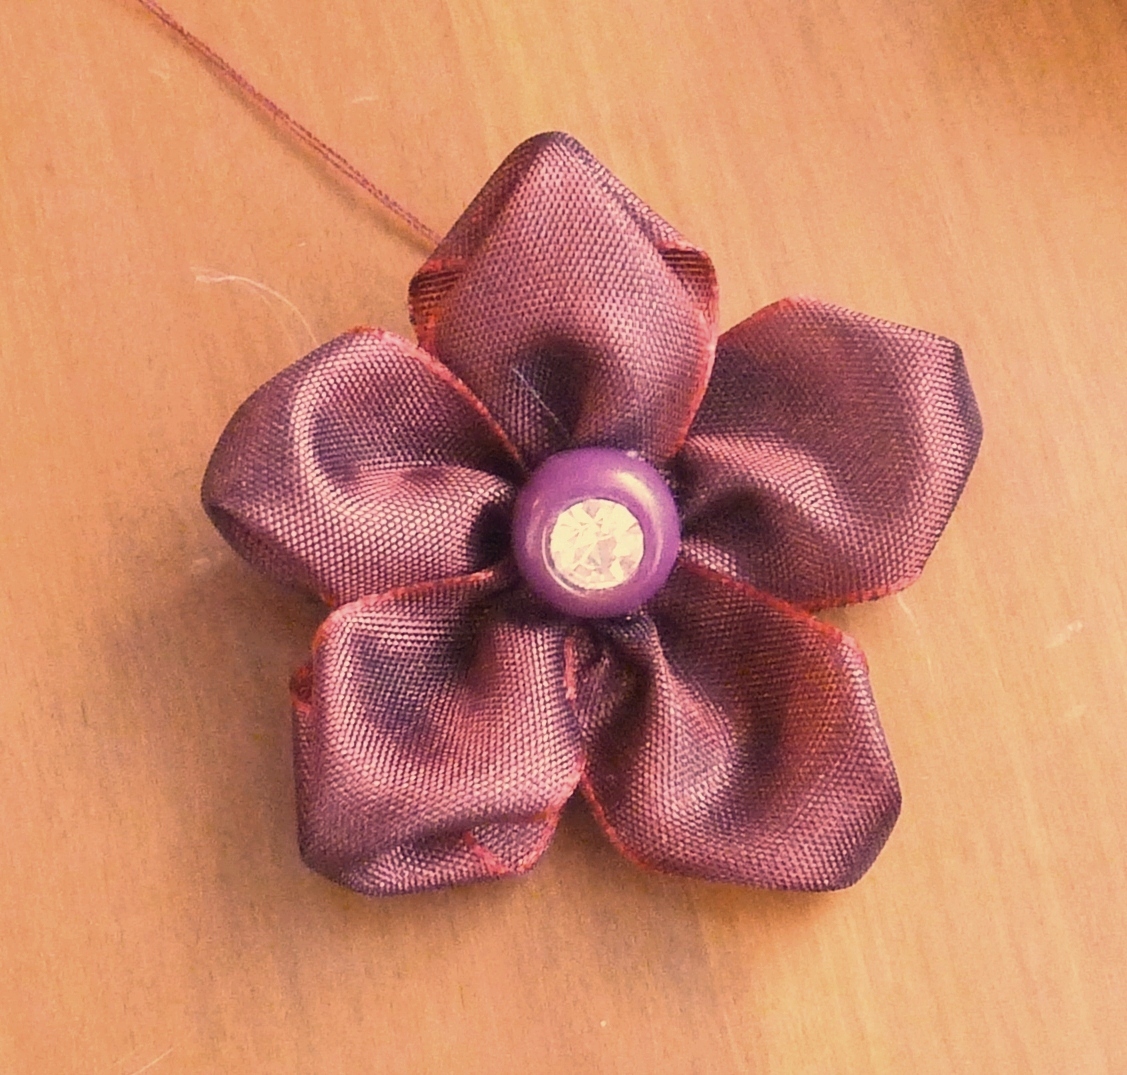
(7) Fluff and arrange the petals until you are happy with the spacing. To cover the center I stitched a button in place, shown directly above. You can use anything in the center that is an appropriate size to cover the raw edges underneath. Below you can see I placed a velvet flower in the center with a small purchased pink organza rose over that. Layering gives you a great look.
Depending on the button you use and the ribbon, you can get a variety of looks with this technique.
I ended up not using this on my quilt, but may use it in another project, perhaps turning it into a brooch by simply stitching a pin finding to the back, first adding a small circle of felt between the back of the flower and the finding to give it a more finished look. These would also be pretty attached to a headband or even on a gift package. Hmm. What would you use it for?
13 comments:
Just gorgeous, Love your flower tutorial!
hugs Lynn
Thanks Connie I've been looking to make some different flowers with my french ribbon.
x
Carole
Thanks! And it looks great on your block!
Спасибо! Красиво и понятно!
Thank you for the tutorial! It is always good to know how to create your own flowers. Sometimes you just can't find something pre-made that will work. You are right they are very useful for lots of things. Would be pretty on an Easter Egg.
Deb
This is a great tutorial , thanks for sharing and your work looks absolutely gorgeous.
Thanks! Looks easy enough. I'll have to search through my ribbons - I'm wondering how it would look with one of those organza ribbons. I'm feeling the itch to decorate a hat with them, and I don't wear hats!
Thanks! Looks easy enough. I'll have to search through my ribbons - I'm wondering how it would look with one of those organza ribbons. I'm feeling the itch to decorate a hat with them, and I don't wear hats!
Sorry it double posted. It did that the other day, too!
Awesome tutorial! Thanks for the how to. The flower is very pretty and would look pretty on so many things. LOVE the two blocks you pictured a couple of post back...beautiful pieces!
Jane
Nice tute, Connie. They'd be perfect for just about anything!
Love how the block is coming along, too.
Just beautiful. Thank you for the tutorial. I think they would also be beautiful to decorate a button box with or on top of a pincushion. Just lovely!
Very pretty flower - I will have to try some of these!
Post a Comment